Bitcoin mining remains one of the most critical components of the cryptocurrency ecosystem. As we move deeper into 2025, mining continues to evolve rapidly with powerful new ASIC machines, an increased focus on sustainability, and the expansion of mega-sized mining farms across the globe.
This guide will walk you through what Bitcoin mining is, the latest trends shaping the industry, the best mining hardware available today, and a look inside some of the world’s largest mining operations. We’ll also briefly explore other cryptocurrencies still using Proof-of-Work (PoW).
🔹 What Is Bitcoin Mining?
Bitcoin mining is the process of validating transactions and securing the Bitcoin network by solving complex cryptographic puzzles. Miners compete to be the first to solve each puzzle, and the winner gets to add a new block to the blockchain, receiving a reward in newly minted bitcoins and transaction fees.
This process relies on the Proof-of-Work (PoW) consensus mechanism and requires significant computing power and energy. With each Bitcoin halving (the most recent occurred in April 2024), block rewards are reduced—making efficiency more crucial than ever.
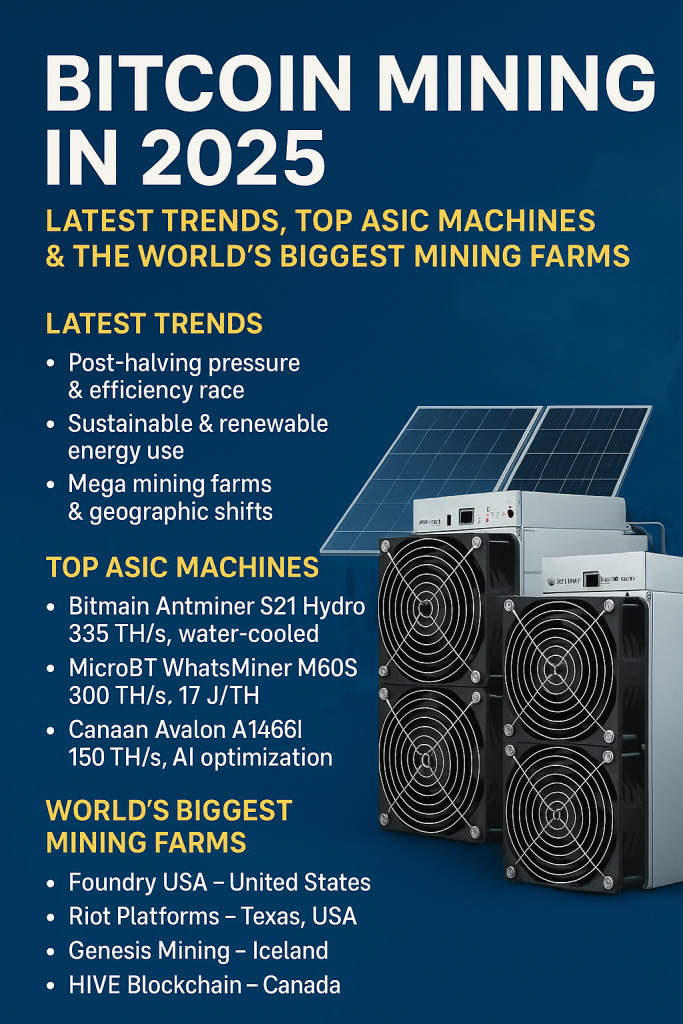
🔹 Latest Bitcoin Mining Trends in 2025
1. Post-Halving Pressure & Efficiency Race
After the 2024 halving reduced block rewards from 6.25 BTC to 3.125 BTC, miners are under pressure to reduce operating costs and maximize performance. Only the most energy-efficient and high-hashrate setups remain profitable.
2. Sustainable & Renewable Energy Use
The environmental impact of mining has drawn global attention. In response, many miners now operate in regions with cheap, clean energy:
Iceland & Norway – Geothermal and hydro power
Texas, USA – Wind and solar integration with grid balancing
Canada – Abundant hydroelectric energy
This shift is not just environmental—it’s also economical, as electricity is the biggest cost factor in mining.
3. Mega Mining Farms & Geographic Shifts
Regulations have pushed mining out of countries like China, redirecting investment to North America, Central Asia, and parts of South America. Massive, industrial-scale mining farms now dominate Bitcoin’s hash power.
4. Mining-as-a-Service (MaaS) & Cloud Solutions
Companies offer hosted mining services, allowing individuals and investors to mine without setting up hardware. This trend makes mining more accessible but also comes with trust and ROI concerns.
5. Decentralized Mining Pools
To reduce centralization risks, miners are joining non-custodial, transparent pools like Ocean or ViaBTC, where they retain control of their mining rewards and payout transparency is emphasized.
🔹 Top ASIC Mining Machines of 2025
Mining hardware is the foundation of any operation. The newest generation of ASIC (Application-Specific Integrated Circuit) miners is optimized for performance and energy savings.
🔸 1. Bitmain Antminer S21 Hydro
Hashrate: 335 TH/s
Efficiency: ~16 J/TH
Cooling: Advanced water-cooled system
Highlights: Ideal for large-scale, high-density mining farms.
🔸 2. MicroBT WhatsMiner M60S
Hashrate: 300 TH/s
Efficiency: ~17 J/TH
Known for: Reliability, simple firmware, and lower failure rate.
🔸 3. Canaan Avalon A1466I
Hashrate: 150 TH/s
Features: Built-in AI optimization, better thermal controls.
Use case: Mid-sized farms and power-sensitive operations.
These machines are in high demand and form the backbone of 2025’s top mining farms.
🔹 Leading Bitcoin Mining Farms in the World
Bitcoin mining is no longer a garage operation. Massive farms—some the size of data centers—are now driving most of the network’s hash power.
🔸 1. Foundry USA – United States
The largest mining pool in North America.
Backed by Digital Currency Group.
Operates large-scale mining with sustainable energy integration.
🔸 2. Riot Platforms – Texas, USA
One of the biggest Bitcoin miners globally.
Strategically located to access Texas’ renewable energy grid.
Runs some of the most efficient, high-density farms.
These entities control significant portions of the global hash rate, influencing block generation and mining profitability.
🔹 Other Mineable Cryptocurrencies (2025)
While Bitcoin dominates mining, several altcoins still use PoW and can be mined with GPUs or CPUs:
Litecoin (LTC): Uses Scrypt; often mined alongside Dogecoin.
Monero (XMR): Uses RandomX; privacy coin that supports CPU mining.
Ethereum Classic (ETC): Continues to use Etchash after Ethereum’s PoS shift.
Kaspa (KAS): A fast-emerging PoW project using DAG and kHeavyHash.
These coins are especially attractive for hobbyists or miners priced out of Bitcoin mining.
🔹 Final Thoughts
In 2025, Bitcoin mining is more competitive and industrialized than ever. The combination of cutting-edge ASIC hardware, geographic migration, and a global push for green energy is reshaping the entire landscape.
Whether you’re an investor, miner, or enthusiast, understanding these trends—and staying updated on the latest machines and farms—is essential. Bitcoin’s next halving cycle is already in sight, and the mining race is only getting hotter.
You can develop your very own cryptocurrency using your laptop that runs Windows operating system. This article a step by step guide for newbies to easily developing and deploying a token using the sample code provided by the Truffle framework. Truflle is a world-class development environment, testing framework and asset pipeline for blockchains using the Ethereum Virtual Machine (EVM).
This is a step-by-step guide for developing an Ethereum-based cryptocurrency on Windows.
To start the project, we need to set up a development environment with the following requirements:
A code editor
Source control
Unit tests
Debugging
For code editor, we use Visual Studio code for the following reasons:
VS Code integrates very well with Git for source control. Git is currently the best choice for source control.
VS Code works well with Truffle framework that manages unit tests.
VS Code works well with Truffle for debugging
Besides that, Visual Studio code is a great tool for editing Solidity smart contracts and is available on Windows, Mac & Linux.
I. Installation of the Packages
Step1: Install Chocolatey
Launch PowerShell as administrator. In PowerShell, enter the following command:
Set-ExecutionPolicy Bypass
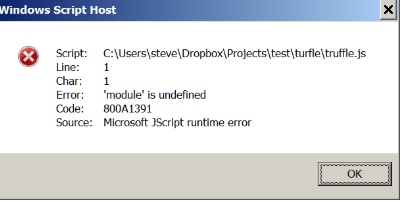
*The Set-ExecutionPolicy changes the user preference for the Windows PowerShell execution policy.*Bypass-Nothing is blocked and there are no warnings or prompts. This execution policy is designed for configurations in which a Windows PowerShell script is built in to a a larger application or for configurations in which Windows PowerShell is the foundation for a program that has its own security model. * Why Chocolatey-“You’ve never deployed software faster than you will with Chocolatey.” -Rob Reynolds. Chocolatey is a software management automation.
Install Chocolatey by entering the following code:
*https://chocolatey.org/docs/installation *iex-invoke expression-The Invoke-Expression cmdlet evaluates or runs a specified string as a command and returns the results of the expression or command. Without Invoke-Expression, a string submitted at the command line would be returned (echoed) unchanged.
*A cmdlet (pronounced “command-let”) is a lightweight Windows PowerShell script that performs a single function.
* https://chocolatey.org/install.ps1 downloads the Chocolatey installation zip file, unzips it and continues the installation by running a scripts in the tools section of the package.
After installation completed, close and reopen PowerShell as administrator again.
Step 2 Install Visual Studio Code, Git and Node.js
*As an asynchronous event driven JavaScript runtime, Node is designed to build scalable network applications. In programming, asynchronous events are those occurring independently of the main program flow. Asynchronous actions are actions executed in a non-blocking scheme, allowing the main program flow to continue processing
Close and reopen PowerShell before proceeding to the next step
Step 3 Install Truffle Framework
Truffle is a world class development environment, testing framework and asset pipeline for Ethereum, aiming to make life as an Ethereum developer easier
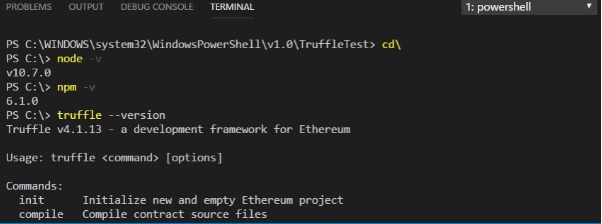
You can check the version of installed packages with the following code:
node -v
npm -v
truffle --version
The output is as shown in Figure 1.
Figure 1
II. Configuring VS Code for Ethereum Blockchain Development
Step 1 Choose the folder for your project
Choose a folder you prefer for your project and enter the following code:
mkdir TruffleTest; cd TruffleTest; code .
The final command in the chain is “Code .”, which opens an instance of Visual Studio Code in the folder from which the command is executed.
Step 2 Install Solidity in the VS Code IDE
In the VS Code IDE, search for Solidity and install it
Step 3 Install Material Icon Theme
In the VS Code , install Material Icon Theme
Now you have the VS integrated with PowerShell IDE for Ethereum Blockchain development.
III. Creating a Blockchain Application
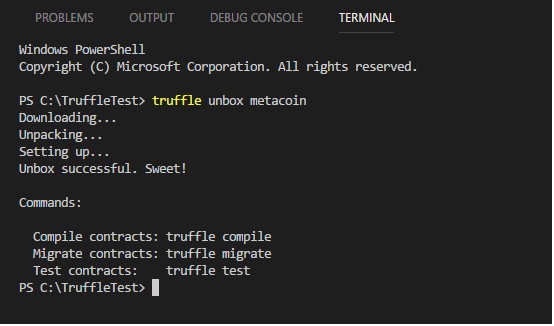
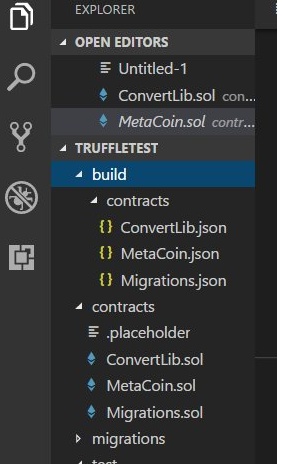
We will create a sample cryptocurrency and a smart contract using the built-in sample MetaCoin in Truffle. Now, download the files that can be compiled and deployed to a simulated blockchain using Truffle.
The code is
truffle unbox metacoin
The output should looks as shown in Figure 2.
Figure 2
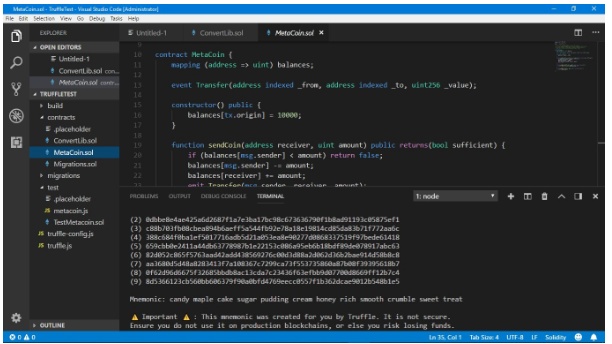
After downloading Truffle metacoin, we should be able to view two important application files written in Solidity, MetaCoin.sol and ConvertLib.sol, in Figure 3.
* Solidity is a contract-oriented, high-level language for implementing smart contracts. It was influenced by C++, Python and JavaScript and is designed to target the Ethereum Virtual Machine (EVM).
*the Ethereum Virtual Machine is designed to serve as a runtime environment for smart contracts based on Ethereum.
Figure 3
These two files can be compiled and deployed to a simulated blockchain using Truffle.
To compile the smart contract, using the following command
truffle compile
*Or use truffle.cmd compile if there is error as shown in Figure 4.
After compilation completed, You will notice that a ‘build’ folder has been added to the list of files, which contains the compiled json files ConvertLib.json, MetaCoin.json, and Migrations.json, as shown in Figure 5.
Figure 5
IV Deploying the Contract
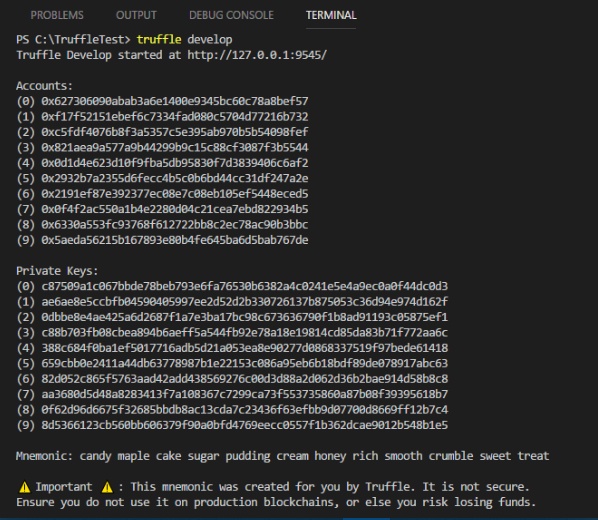
To deploy the contract, we shall migrate the contract to a test network in truffle development environment.
The ‘develop’ command appears in the Truffle development console environment. This will set up a kind of dummy blockchain, that operates similarly to the real Ethereum blockchain, and allows us to test deployment and execution of the code without needing to interface with an actual blockchain.
To compile the contract, key in the following command
truffle develop
This command will launch the truffle development environment, automatically configured with 10 accounts and keys. The output is as shown in Figure 6.
Figure 6
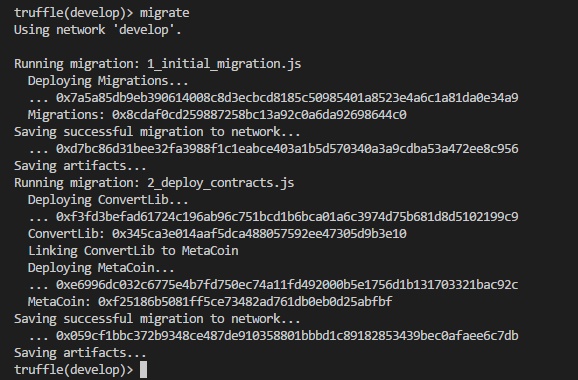
To deploy the compiled contract to the Truffle environment, enter the following command:
migrate
This will deploy the contracts to the test environment. The output is as shown in Figure 7.
Figure 7
To test the contract, enter the following command
test
You will see the output as shown in Figure 8.
Figure 8
To exit the Truffle console, type ctrl+D
To reenter the Truffle console, enter the following code
truffle develop
migrate --reset
test
V Interacting with the contract with Web3
We have deployed and test the contract, now let’s do something with the contract. We will need to use the Web3 framework to interact with the smart contract on the Ethereum blockchain. Web3 is a JavaScript library which is bundled into the Truffle development console.
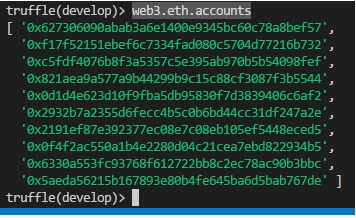
When the Truffle development console is started, it automatically configures 10 addresses, and assigns each of the addresses 100 Eth. You can check the ten available addresses by entering the following code:
web3.eth.accounts
The output is as shown in Figure 9.
Figure 9
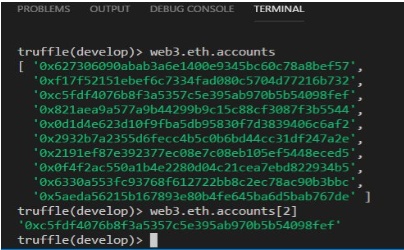
You can display individual account using the following syntax
web3.eth.accounts[n]
For example, enter the following code to see the output
web3.eth.accounts[2]
The output is as shown in Figure 10.
Figure 10
Functions in the MetaCoin.sol file
There are four functions in the MetaCoin.sol file, as follows:
MetaCoin, the constructor. It is called when the contract is deployed.
sendCoin, for transferring coins between addresses.
getBalanceInEth, to convert between MetaCoins, and Ethereum.
getBalance, to show the balance in the requested address.
* A constructor is a special method of a class or structure in object-oriented programming that initializes an object of that type. A constructor is an instance method that usually has the same name as the class, and can be used to set the values of the members of an object, either to default or to user-defined values.
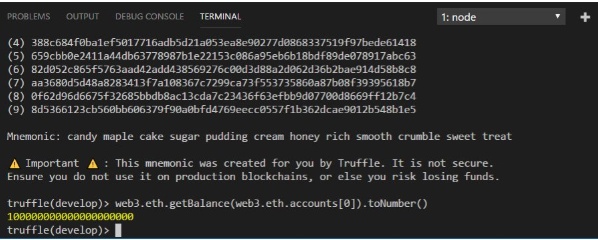
The constructor MetaCoin comprises only one line
balances[tx.origin] = 10000;
*You can change this to any amount
This code initialises the transaction to 10000 MetaCoin(Not Eth)
The initial address is
Web3.eth.accounts[0]
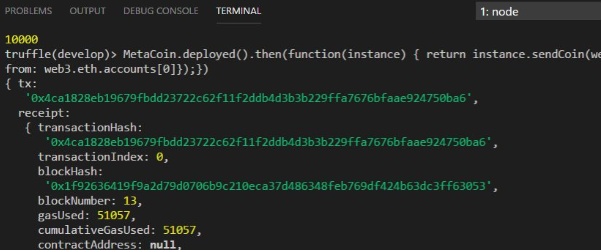
Checking Balance using the getBalance() method
You can check the balance of any account using the following code
The check whether the transaction is successful , we can check the balance of both accounts. (Note that this is the MetaCoin balance, NOT the Eth balance)
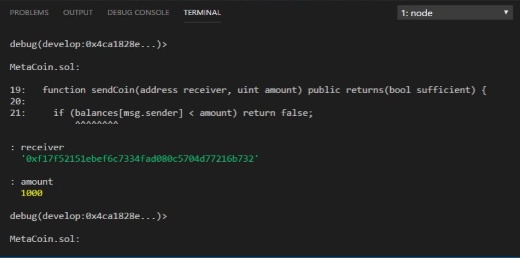
In the sendCoin() example, a transaction has occurred on the blockchain. This transaction can be stepped through line by line, using the Truffle debugger. To do this , the Truffle debug command is used, passing in the transaction hash. This hash can be found in the console output following the sendCoin function call.
This will start the Truffle debugger. The instructions for interacting with the debugger are printed to the console, as shown in Figure 17.
Figure 17
You should start by adding a watch to the passed variables. do this by entering the following command:
+: receiver
+: amount
As you step through the code, the values passed into the function will be shown. Note, these are ‘undefined’ at the start of the function call.
You can press the enter key a few times to step through the code that was executed in this transaction. The output is as shown in Figure 18.
Figure 18
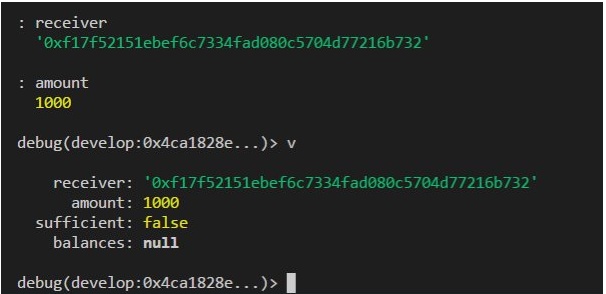
The debug commands can be used to inspect the variables, and add watched variables, as shown in Figure 19.
Figure 19
You can try to enter other commands.
Lastly, type quit to quit debugger
Deploying Your MetaCoin Contract with Truffle
Deploy to Ganache
Ganache is your personal Ethereum blockchain which is convenient for testing and interacting with your contracts during development. It ships with a helpful GUI that allows you to see available test accounts quickly, explore transactions, read logs, and see how much gas was consumed. Configure your truffle.js and truffle.config.js for the Ganache network:
module.exports = {
  networks: {
    ganache: {
      host: "127.0.0.1",
      port: 7545,
      network_id: "*" // matching any id
    }
  }
};
Launch Ganache
In the Truffle console, enter the following command:
truffle migrate --network ganache
The output is as shown in Figure 20.
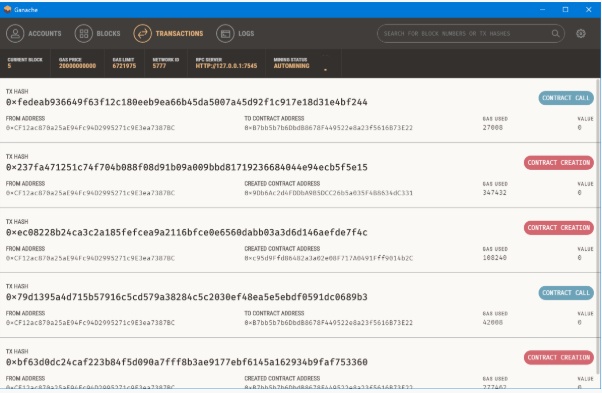
Figure 20
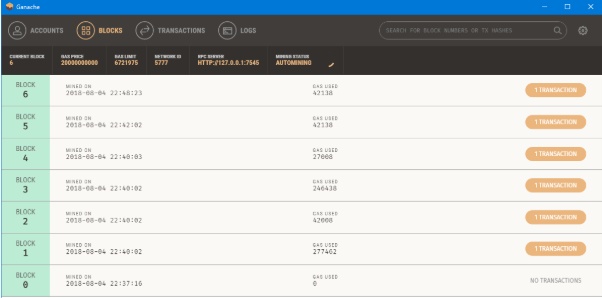
Ganache output is as shown in Figure 21.
Figure 21
Click transaction and compare the transaction hash. They are the same.
Figure 22
Deploy to Ropsten
Run a node connected to Ropsten and specify the address of the default (first) account to unlock. You will be prompted for a passphrase.
Blockchain always faces the trade-off issue between security and scalability. Though their PoW consensus protocol guarantees near perfect security, it also slows down the processing speed significantly. Currently, the Ethereum processing speed is 15 transactions per second while Bitcoin is 7 transactions per second. Both platform’s processing capacities are nowhere near Visa’s processing speed of 45,000 transactions per second. Furthermore, the increase in the number of dapps deployed on the main Ethereum main chain has caused congestion and slows down transactions tremendously. One of the most famous cases is Cryptokitties, it clogged up the Ethereum network in just a few weeks of deployment due to its unprecedented popularity.
In seeking a viable solution to the scalability issue, Vitalik Buterin and Joseph Poon have joined hands in conceptualizing and developing Plasma, a framework that can scale Ethereum processing power. Joseph is also the co-founder of the Lightning network, a framework that has greatly increase Bitcoin processing speed. Both plasma and Lightning network are trustless multilayered blockchain networks.
Plasma
Plasma is a system that comprises the main blockchain and the ‘child blockchains’ that branch out from the main blockchain(aka parent blockchain or root blockchain). The child blockchains can co-exist but function independently from the parent chain and each other.
The Plasma system allows anyone to create their own child blockchains a.k.a plasma chains with their own smart contracts. Therefore, the Plasma system enables the creation of all kinds of use cases based on different business logic in their smart contracts. To ensure security, the root chain monitor and enforces the state in all the plasma chains and penalize the bad actors if there is proof of frauds. In this way, the Plasma system makes off-chain transactions possible while relying on the Ethereum main blockchain to maintain its security.
The Plasma Structure
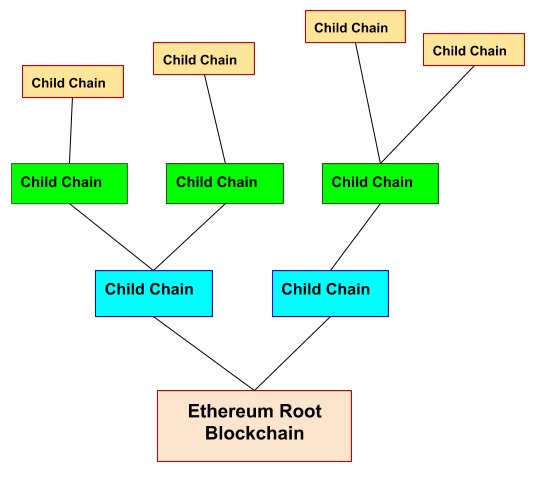
Actually, the Plasma architecture is like a tree structure with the main Ethereum blockchain as the root. The child blockchains then branch out from the root blockchain, similar to branches grown out from the root of a tree. Every child chain, in turn, can spawn new child chains, the process can go on. Therefore, the plasma structure constitute a hierarchy of blockchains, as shown below:
Plasma Blockchain Structure
How does Plasma Works?
Plasma can greatly increase processing speed and throughput on the Ethereum blockchain because it allows off-chain transactions, similar to the payment channels of the Lightning network and other off-chain technologies. All the off-chain techniques take operations away from the main Ethereum blockchain.
State Channels
The concept of Plasma was derived from State Channels but improved on the latter. State channel works by creating an off-chain communication channel (a.k.a state channel )where transactions are not sent to the smart contract on the main chain, instead, they are sent through the Internet without touching the main blockchain. It is only after all the transactions have been completed (for example, a crypto game has finished) that the final state is sent to the smart contract on the main chain, closing the channel in the process. The smart contract will check the legitimacy of the transactions and release the asset (such as some ETH or a prize) to the recipient.
The state channel technique can improve scalability because it can reduce the number of transactions on the main blockchain. For example, a crypto chess game played between two players may involve hundreds of moves, which means hundreds of transactions will be executed on the Ethereum blockchain. However, if we use the state channel, we need to execute only 3 transactions that include registration of the players to initiate the game, submission of the final state to the blockchain and closing the channel.
Steps in Implementing Plasma
Plasma works in a similar way but with a different approach. Instead of creating the channels, it creates the child blockchains, as illustrated earlier. Smart contracts are created on the main Ethereum blockchain(The root chain) and they define the rules in the child blockchains. In other words, the smart contract serves as the root of the child blockchains. The child blockchains can employ their own consensus algorithm, such as proof of stake. The blocks validator will submit the state of the child chain to the Root Chain smart contract periodically. The smart contract will register the state of each Child Chain in the form of block hashes of the Child Chain.
We can illustrate how Plasma works by examining a crypto game such as crytant crab or cryptokitties. The smart contract on the main chain will set the rules of the game, then deploy the actual game application smart contracts on the child-chain, which contains all of the game logic and rules. The game assets such as characters or collectibles are created on the Ethereum main chain and then transferred onto the child-chain using the plasma root. When the players play the games, all the executions are confined to the child chain, without interacting with the root chain.
Plasma Exits
Plasma Exits is a security mechanism behind Plasma that allows users in a Plasma Chain to stop participating in the chain, and move their funds or assets back to the root chain. When a user wishes to exit a particular child chain, he or she needs to submit an exit application. The application is not immediately approved because a proof is required. This waiting period is called the challenge period, which means anyone can challenge the user’s claim by submitting a fraud proof. If the challenge is not valid or there is no challenge, the application will be approved and the user can exit and collect back his assets or funds.
Plasma is still evolving and now the Plasma team has come out with the improved version of Plasma known as Plasma cash. We shall discuss this new version in coming articles.
By definition, gas is a unit that measures the amount of computational effort that it will take to execute certain operations on the Ethereum blockchain. The operations include sending tokens, deploying a smart contract, interacting with a contract, sending some ETH, launching an ICO, or anything else on the blockchain. Gas is needed to power the Ethereum Ecosystem, just like fuel is needed to power a car.
What is Gas Price?
As I have mentioned earlier, we need to use gas for every operation made on ethereum, regardless of whether your transaction succeeds or fails. Gas does not come free, we need to pay for it, just like paying for the gasoline in order to drive our cars. How much transaction fee we need to pay depends on the gas price and the gas limit.
Gas price is the amount of Ether you need to pay per unit of gas. It is measured in Gwei (1Gwei=0.0000000001 ETH). Its value is determined by the miners, who can refuse to process the transaction with less than a certain gas price. The transaction fee is paid to the successful miner as a form of incentive that motivates the miners to maintain the nodes. Therefore, they have the controlling power over the gas price. We must have enough ether in our wallet to pay for the gas fees.
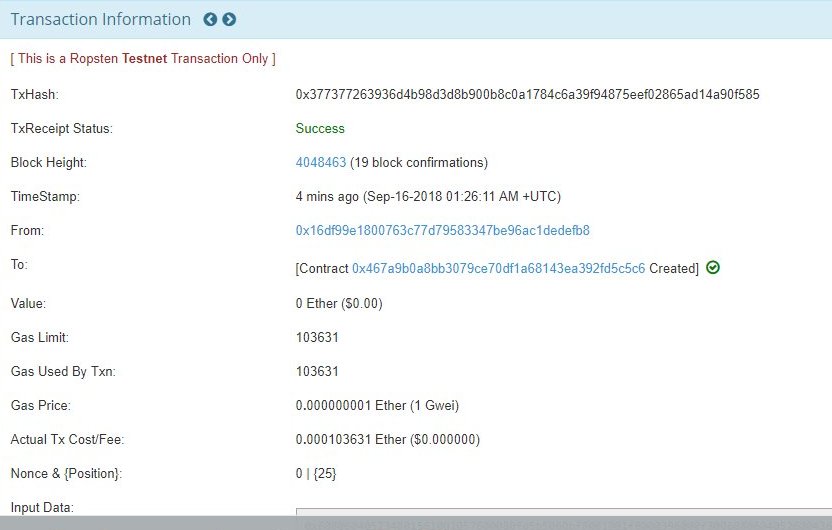
The transaction fee is calculated using the following formula
Transaction fee= Gas unit used x Gas price
For example, for a certain transaction,
gas unit used=103631
Gas price= 1Gwei or 0.000000001 Eth
So transaction fee= 103631×0.000000001 Eth=0.000103631 Eth
You can see the actual output in a smart contract deployment on Etherescan, as shown in the figure below:
In addition, you can “bribe” the miners to do your work first by paying more gas fees. In this way, you can jump to the front of the queue so that your transaction can be processed first. Even if the transaction fails, you still need to pay for the transaction fee because the miners must validate and execute your transaction.
Gas Limit
The Gas Limit is an estimation of the total amount of work to perform a transaction. It is not easy to compute the gas limit. Fortunately, there are many apps that set the limit for us. Typically, 21,000 Gas will satisfy most transactions. However, for more complex transactions such as sending ETH to an ICO smart contract, the gas limit will be much higher. The reason is such a transaction requires much more computational power.
If you set the limit is too low, your transaction may take too long to process and even fail. As a result, you will lose ETH for nothing. On the other hand, if your transaction was completed before reaching the gas limit, you get back the balance ETH. The Gas Limit protects you from spending unlimited ETH, just like what banks set your credit card limit so that you will not overspend.
Setting up a private Ethereum blockchain network is not an extremely difficult task for the coders. However, it may be a bit of a challenge for the beginners. I will skip some technical details and avoid using some jargon so that everyone can understand the basic concepts.
Prerequisites
Before setting up the network, you need to install the following software:
Visual Studio Code
git
NodeJs
Ethereum Wallet
Geth
The go-ethereum client is commonly referred to as geth, which is the command line interface for running a full Ethereum node implemented in Go. By installing and running geth, you can run a private network or participate in the Ethereum main network. By running geth, you can perform the following tasks:
mine real ether
transfer funds between addresses
create smart contracts and send transactions
explore block history
and much much more
Creating the Genesis Block
To set up the private network, we need to create the Genesis block, the first block of the blockchain in our network. The code for the genesis block is written in JSON format. JSON stores data as a name/value pair. For example:
"name": "John"  ,
"age": 30
It uses JavaScript syntax, but the format is text only. Therefore, JSON can be read and used as a data format by any programming language. You can use any text editor to write the JSON code(JSON: JavaScript Object Notation), I use Notedpad++. The sample code for the genesis block is as follows
I will not discuss the contents of the genesis block here. Copy the code in a text editor and save the file as
myGenesis.json
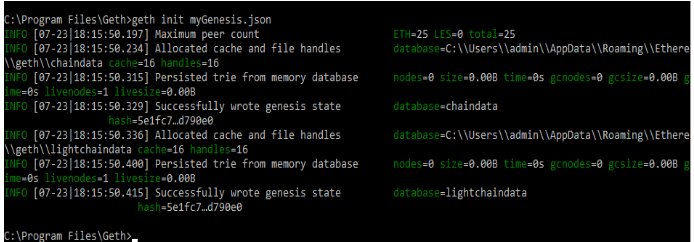
Now run the following command in the command prompt to initialize the genesis block
geth init myGenesis.json
The output is as follows:
Once the genesis block is successfully created, a folder name ‘Ethereum’ will be created in the following path:
“C:\Users\admin\AppData\Roaming\Ethereum”
This folder contains the details of the Private Blockchain.
Starting the Private Network
Once the genesis block is created, run the following command to start the private network:
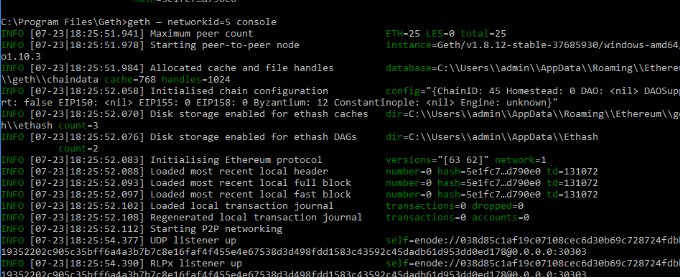
geth — networkid=5
*“networkid=1” stands for the main Ethereum network. So any random number apart from 1 can be given as the network id. Also, “console” is appended to the command in order to enable us to write commands while the network is running.
The output is as follows:
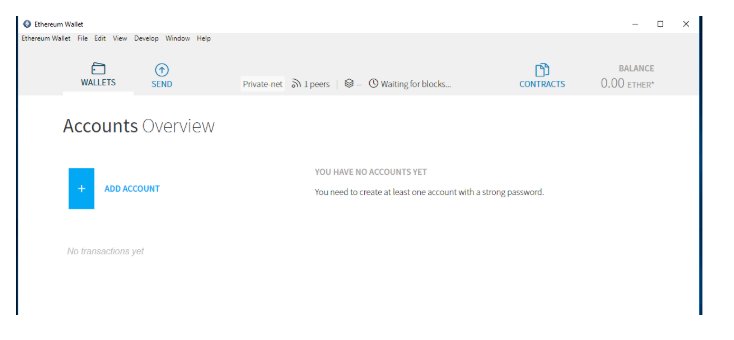
Launching the Ethereum Wallet
The output is as shown in the following figure. Notice that the network name is Private net.
Creating a New Account Address
You can create an address in the Ethereum Wallet application. The address can be created on the Ethereum Wallet App. In the ‘Wallets’ section, click on ‘Add Account’ to create a new account address.
To create new account using the Geth Console, use the following command:
geth account new
The output
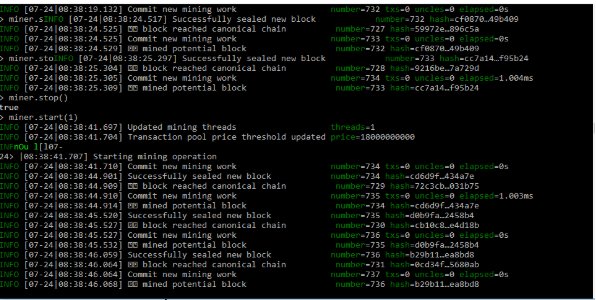
Start Mining
To start mining on the private network, Enter the geth console with the following command
Geth --rpc console
In the Geth Console type
miner.start()
The output is as follows
Now you can see that the mining process is generating Ethers , as shown in the following figure. Bear in mind that these are fake Ethers and can only be used for a private test net.
Stop Mining
Type Ctrl+C in the geth console and key in the following command: