Smart Contracts

Introduction

In the blockchain network, a user can send some crypto money to another user in exchange for something of value where the transaction is executed automatically based on a smart contract. In another case, a smart contract is executed when a user acquires a unique virtual kitty from the Cryptokitties collectible marketplace via a bidding process, the highest bidder gets to own the digital asset.

On the other hand, a transaction can occur automatically between two smart devices using an integrated system of IoT technology and blockchain. For example, a smartphone A can top up data for another smartphone B after A received some money from B, the transaction occurs based purely on a smart contract without the awareness of the owners.

According to Investopedia, smart contracts are ,

“self-executing contracts with the terms of the agreement between buyer and seller being directly written into lines of code. The code and the agreements contained therein exist across a distributed, decentralized blockchain network. Smart contracts permit trusted transactions and agreements to be carried out among disparate, anonymous parties without the need for a central authority, legal system, or external enforcement mechanism. They render transactions traceable, transparent, and irreversible.”

Definition of Smart Contract

Based on the aforementioned descriptions, we can define a smart contract as a computer code that can facilitate the exchange of money, content, property, shares, digital assets or anything of value among disparate and anonymous parties without a middle entity.

When a smart contract is installed in a blockchain system, it behaves like a self-operating computer program that automatically executes when some specific terms and conditions are met. Because smart contracts run on the blockchain, they run exactly as programmed without any possibility of censorship, downtime, fraud or third-party interference.

A Brief History of Smart Contracts

In contrary to popular belief, the smart contract is not invented by Vitalik Buterin, the founder of Ethereum. In actual fact, the idea of the smart contract was first conceived by computer scientist and cryptographer Nick Szabo in 1993 as a kind of digital vending machine. In his famous example, he described how users could input data or value, and receive a finite item from a machine, in this case, a real-world snack or a soft drink. Nick Szabo is so smart that some people believe that he could be Satoshi Nakamoto who invented bitcoin.

In addition, though Ethereum is the first blockchain system that has adopted the smart contract technology, it is not the only one using smart contracts. Many Non-Ethereum blockchain platforms such as Hyperledger Fabric, Hyperledger Sawtooth and Corda implement their own versions of smart contracts. The smart contract in Hyperledger Fabric is known as Chaincode that runs in a container known as docker(I will discuss Chaincode and how to install it in Docker in a future article). 

Today, most blockchain platforms run on Ethereum Virtual Machine(EVM) implement Ethereum smart contract while a few enterprise blockchain platforms implement their own version of smart contracts. However, there could be interoperability between the Ethereum platform and the enterprise platforms. For instance, in the Sawtooth-Ethereum integration project,  EVM (Ethereum Virtual Machine) smart contracts can be deployed to Sawtooth using the Seth transaction family.  I will discuss Hyperledger technologies in another article.

Solidity

Solidity is a high-level programming language that is used to create and implement smart contracts on Ethereum platform. The smart contracts created using Solidity can be used for financial transactions, crowdfunding, voting, supply chain management, IoT implementation, ride sharing automation, smart city administration and more.

Solidity has Python, C++ and JavaScript influences. Therefore, it is fairly convenient and easy to grasp for those that are already familiar with the Python, C++ or JavaScript. 

Writing and Deploying the Smart Contract

The Integrated Development Environment (IDE)

The best tool to write, compile, test and deploy smart contracts is RemixRemix is a browser-based IDE that provides an inbuilt compiler as well as a run-time environment without server-side components. You can access Remix from the following link: https://remix.ethereum.org

We can also use other code editors for Solidity . I suggest we use Visual Studio Code or Solidity Plugin for Visual Studio. For Solidity plugin, you need to download it from https://marketplace.visualstudio.com/items?itemName=ConsenSys.Solidity

Besides that, you need to install Visual Studio 2015. I shall skip the technical details for now. (I will discuss how to use Visual Studio Code in compiling and deploying smart contracts in another article).

The Smart Contract Code

A smart contract is a data, that can be referred to as its state, and code, which can be referred to as its functions, collection, that resides on a specific address in the Ethereum blockchain. Let us begin with the most basic example. It is fine if you do not understand everything right now, we will go into more detail later. Enter the follow codes in the Remix IDE and save the file as MyStorage.sol

pragma solidity ^0.4.25;

contract MyStorage {
   uint storedData;

   function set(uint x) public {
       storedData = x;
   }

   function get() public view returns (uint) {
       return storedData;
   }
}

Understanding the Code

The first line simply tells that the source code is written for Solidity version 0.4.25 or anything newer that does not break functionality .This is to ensure that the contract does not suddenly behave differently with a new compiler version. The keyword pragma is called that way because, in general, pragmas are instructions for the compiler about how to treat the source code.

A contract in the sense of Solidity is a collection of code (its functions) and data (its state) that resides at a specific address on the Ethereum blockchain. The line uint storedData; declares a state variable called storedData of type uint(unsigned integer of 256 bits). You can think of it as a single slot in a database that can be queried and altered by calling functions of the code that manages the database. In the case of Ethereum, this is always the owning contract. And in this case, the functions set and get can be used to modify or retrieve the value of the variable.

To access a state variable, you do not need to use the prefix this that is commonly used in other programming languages. This is just a simple contract that does not do much yet apart from allowing anyone to store a single number. This number is accessible by anyone in the world without a feasible way to prevent you from publishing this number. Of course, anyone could just call set again with a different value and overwrite your number. However, the number will still be stored in the history of the blockchain. Later, we will see how you can impose access restrictions so that only you can alter the number.

The Remix IDE

Now enter the code in the Remix IDE, as shown in the following figure:

The Metamask Wallet

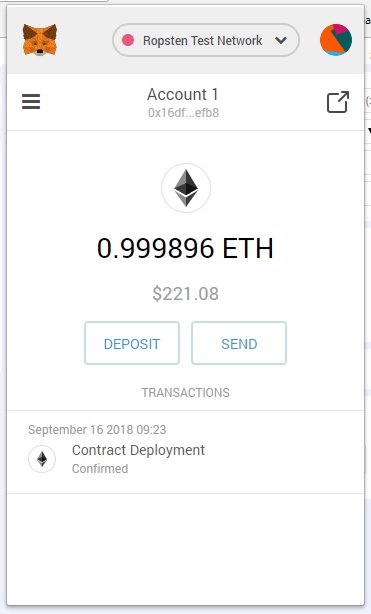
In addition, you need to install the Metamask wallet using the Chrome or Firefox extension plugin. After installing Metamask, create an account and connect it to Ropsten Test Network, as shown in the figure below:

Besides that, you need to get some free Ethers to run the test. You can get 1 free Ether for Rospten Testnet from  https://faucet.ropsten.be/. Upon loading the website, copy and enter your Metamask wallet address, and click the send me test Ether button, as shown in the following figure:

After a  while, you can see 1 Ether is deposited into your Metamask wallet, as shown in the figure below:

Next, in the Remix IDE, change the environment to Injected web3, the Ropsten Test Network. You can see that your wallet address appears in the account box, as shown in the first Figure. Now click on the Deploy button. After clicking this button, the Metamask wallet will pop up, prompting for confirmation, as shown in the following figure:

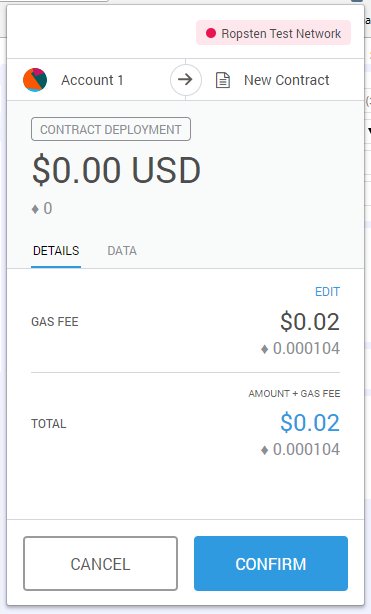
After clicking the CONFIRM button, you will see that some Ether had been deducted from your account which showed that the contract has been successfully deployed, as shown in the following Figure:

Besides that, you can also view the transaction on Etherscan, as shown in the following Figure:

Finally, you can also check the deployment of the smart contact in the Remix debug window, as shown in the following figure:

In addition, you can view some extra information on the right column on the Remix windows, like the name of the smart contract(Mystorage) , how much gas limit and how many transaction etc.

If you are sure the smart contract is bugs free, you may want to deploy it to the Ethereum Mainnet. In that case, change the Environment to Web3 Provider. You will be prompted with the following dialog:

Wait, you need to install Go Ethereum, the client commonly referred to as geth, which is the command line interface for running a full Ethereum node implemented in Go. Install Go Ethereum from the following link: https://geth.ethereum.org/downloads/

After installing Go Ethereum, there a few more windows system set up before you can run geth. I will not go through the steps here, a bit tedious, I have documented them in another document. If you are keen I can share it with you in the future. Let’s say your environment is ready, you can key in the following command in the command line:

geth --rpc --rpccorsdomain "https://remix.ethereum.org" console

Your computer will now link to the Ethereum mainnet via Remix, as shown in the following figure:

Now click OK on the Remix dialog and bring up the next dialog that prompts you to connect to the Web3 Provider Endpoint, as shown in the figure below:

Click OK and now you can deploy the contract to the Ethereum Main Network. Notice that now the Environment is Web3 Provider, which is the Ethereum Mainnet, as shown in the following Figure:

Before you can deploy the smart contract to the Ethereum mainnet ,you need to have the actual Ether to deploy the contract. I suggest you don’t do it here unless you have developed the actual use case and ready to go for ICO.

Happy Learning!

Creating Your Own Token for ICO

ICO is a hot topic in the crypto world today. In this article, I will attempt to explain how to create your own token for an ICO project. 

First of all, you need to set up a private Ethereum network, before you can proceed to create the token. After setting up the private network, you need to run it. (The detail steps for setting up a private Ethereum network is discussed in another article)

Next, you need to install the Ethereum wallet before you proceed. Follow the steps below to install the Ethereum Wallet.

  1. Install Ethereum Mist Wallet for Windows 10.
  2. Visit the link https://github.com/ethereum/mist/releases
  3. Download Ethereum-Wallet-win64-0-11-0.zip
  4. Create a folder Ethereum under the Program Files folder and extract the zip files there.

Launch the Ethereum wallet after successful installation. Also, create an account in the wallet.

Next, Open the Wallet app and then go to the Contracts tab as shown in the figure below:

Click on DEPLOY NEW CONTRACT and bring up the  Solidity Contract Source code text editor as shown the following figure:

Now type the following smart contract  code in the code editor.

pragma solidity ^0.4.24;

contract BestToken {
    /* This creates an array with all balances */
    mapping (address => uint256) public balanceOf;
     string public name;
     string public symbol;
     uint8 public decimals;

    /* Initializes contract with initial supply tokens to the creator of the contract */
 constructor(
     uint256 initialSupply,
     string tokenName,
     string tokenSymbol,
     uint8 decimalUnits
     ) public {
     balanceOf[msg.sender] = initialSupply;  // Give the creator all initial tokens
     name = tokenName;                        // Set the name for display purposes
     symbol = tokenSymbol;                   // Set the symbol for display purposes
     decimals = decimalUnits;               // Amount of decimals for display purposes
    }
    

    /* Send coins */
    function transfer(address _to, uint256 _value) public returns (bool success) {
     require(balanceOf[msg.sender] >= _value);   // Check if the sender has enough
     require(balanceOf[_to] + _value >= balanceOf[_to]); // Check for overflows
     balanceOf[msg.sender] -= _value;                    // Subtract from the sender
     balanceOf[_to] += _value;                        // Add the same to the recipient
     return true;
    }
}

Don’t worry about the code first, I will explain them in another article.

If the code compiles without any error, you should see a “pick a contract” drop-down list on the right, as shown in the figure below:

Click Pick a contract button and select the “BestToken” contract. On the right column, you’ll see all the parameters you need to personalize your own token. You can tweak them as you like, I use the following parameters: 10,000 as the supply, BestCoin for the token name, “#” as the symbol and 2 decimal places. Your wallet should be looking like this:

Scroll to the end of the page and you’ll see an estimate of the computation cost of that contract and you can select a fee on how much Ether you are willing to pay for it. Any excess Ether you don’t spend will be returned to you so you can leave the default settings if you wish. Press “deploy”, type your account password and wait a few seconds for your transaction to be picked up.

Now click the DEPLOY button to deploy the smart contract, the output dialog is as follows:

Upon entering the password for your account and click send transaction, the contract is successfully deployed, as follows:

Now the new token Best Token is shown in your wallet, as follows:

Tokens are currencies and other fungibles built on the Ethereum platform. In order for accounts to watch for tokens and send them, you have to add their address to this list. Proceed to add BestCoin to the list, as shown in the following figure.

Now the new token BestCoin will be shown in the list, as shown in the figure below.  

Now you can send some funds from BestCoin to a wallet, as shown in the figure below:

References

What is Merkle Tree in Blockchain?

In my article ‘Blockchain in a Nutshell’, I have mentioned Merkle tree as one of the metadata in a block of the blockchain. What actually is the Merkle tree? 

In computer science, the Merkle tree is a branching data structure that is used to store hashes of individual data in a large dataset. The purpose is to make the verification of the dataset efficient and fast. It is an anti-tamper mechanism to ensure that the large dataset has not been tampered with. 

In blockchain,  the Merkle tree(also known as the hash tree) encodes the blockchain data in an efficient and secure manner. Every transaction occurring on the blockchain network is subjected to a hashing algorithm to produce a hash, as shown in the figure below. Therefore, every transaction has a hash associated with it.

As there are thousands of transactions stored on a particular block, it will be very time consuming if every node has to deal with hundreds of thousands of transaction across the blockchain, synchronization and mining will take a long time. To solve this issue, all the transactions hashes in the block are also hashed. As illustrated in the following figure, two hashes are hashed into a single hash.

These hashes are not stored in a sequential order on the block, rather in the form of a tree-like structure such that each hash is linked to its parent following a parent-child tree-like relation. The hashing will go on until it produces a singular hash,  the Merkle root. This Merkle root is the hash of the block and it is stored on the header of the block. The process is illustrated in the following diagram:

The Merkle Tree structure will enable the quick verification of blockchain data and quick movement of large amounts of data from one computer node to the other on the peer-to-peer blockchain network.

How to achieve Proof of Work?

According to Wikipedia(2019), A Proof-of-Work (PoWsystem is an economic measure to deter denial of service attacks and other service abuses such as spam on a network by requiring some work from the service requester, usually meaning processing time by a computer. This protocol is adopted by the Bitcoin to enhance the security of the Bitcoin network.

In order to hack the Bitcoin network, the attacker needs to take over 51% of the nodes. However, it is almost impossible to achieve this task as it requires a tremendous amount of computational power and astronomical cost. Proof of work is attained via an activity called mining in Bitcoin and other cryptocurrencies.

Mining involves the process of producing a hash whose value is less than the target value. When this hash has been found, it is called a valid hash and hence proof of work is achieved.

The mining algorithm uses a counter known as the nonce to generate the hash using the SHA256 cryptographic function. A hash algorithm always produces the same arbitrary length data given the same inputs. It is impossible to compute the same hash with two different inputs. It is also impossible to predict the output of any given data in advance. The other important value in proof-of-work is difficulty. Difficulty is a measure of how difficult it is to find a hash below a given target. 

The value of nonce is initialized to 0. Mining is finding the nonce, the only input that changes every time we run the hash function. The goal is to find a value for the nonce that will result in the hash lower than the current target. The formula to compute the current target is

Current target= maximum target ÷ difficulty

Therefore, the mining node might need to try billions or trillions of nonce values before it gets a valid hash. As you can see, mining is like playing the slot machine, there is no way to predict when can you strike a jackpot.

It is very easy to prove that the nonce found indeed produces a valid hash. All the information are available, everyone in the network can run the hash function and confirm if the hash is valid or not. Because it is also impossible to predict what the nonce will be, it also acts as a proof that the miner has indeed achieved Proof-of-Work.

Calculation of the Valid Hash

(The numbers are based on block #540909)

The formula to calculate the current target of the block is

Current target= maximum target ÷ difficulty

Maximum target is set to 

0x00000000FFFF0000000000000000000000000000000000000000000000000000

This is a hexadecimal number. After conversion to a decimal number 

Maximum target= 

26959946667150639794667015087019630673637144422540572481103610249215

Difficulty is (as given in the block)

7019199231177.17

Therefore,
Current target=

(26959946667150639794667015087019630673637144422540572481103610249215)÷7019199231177.17

3.84089×1054

The hash of the block is

00000000000000000000ef17668e407e78c5a247f731b1138ad16f5bf79f1c0d

After converted to a decimal number, the value is as follows:

89454716205495239548871016846060264708718561584946189

The hash value is approximately   8.95×1051

Clearly, the hash value is less than the current target, therefore it is a valid hash.

You can view mining simulation by clicking the following link:

http://javascript-tutor.net/jSample/mining.html

Technical Explanation of Mining

In this article, let’s examine the technical aspects of crypto mining. In the blockchain, every block has a previous block except the very first block or the genesis block. Miners are competing to validate a new block by solving a complex mathematical puzzle. To explain in details, let’s take a look at the latest bitcoin mined block, block #540909 at the time of writing this article.

Notice that the block height is 540909, which means there are 540909 blocks in the bitcoin blockchain.

Let’s call the successful miner for this block Mr.John. Before John successfully mines block #540909, he was actually competing with other miners in mining the previous block #540908. However, he lost in the contest and block #540908 was mined by a fellow miner. As soon as block #540908 was mined, he needs to quickly update his blockchain and starts mining for a new unvalidated block, known as the candidate block.

In actual fact, while John’s computer(also known as a node)  was searching for the Proof of Work for the previous block, it was also searching for new transactions. Those new transactions are added to the memory pool or transaction pool.  The memory pool is a node’s temporary storage area for transaction data. This is where transactions wait until they can be included in a new block and validated.

In constructing the candidate block, John’s node starts gathering the transactions in the transaction pool. It removes the transactions already present in the previous block if there are any. The block is called a candidate block because it doesn’t have a valid Proof of Work yet.

As you can see that block #540909 has 1696  transactions inside it. This was the number of transactions present in John’s transaction pool when he created his candidate block. The mining process can be illustrated in the following figure.

In the mining process, John’s node is creating a coinbase transaction. This transaction is to create some bitcoins and deposit them into John’s wallet as a reward for finding a valid Proof of Work. This transaction is different from the other ones because the bitcoins in the reward are created out of nothing. They do not come from someone’s wallet. Besides that, John’s node also calculates the transaction fees in the block.

John reward by mining this block is as follows;

Total Reward =  Reward for mining block + transactions fee

                    = 12.5 BTC+0.15289664 BTC

                   = 12.65289664 BTC

The details of the transaction is as follows:


You can see the No Inputs (Newly Generated Coins) statement. It is because coinbase transactions do not come from anyone’s wallet, so they cannot have any inputs. You only have the winning miner’s wallet address here