In my article ” Hyperledger Fabric Architecture Part 1“, you have learned about the client applications, endorsing peers and committing peers as well as well as the ordering service. We have also discussed the transaction workflow and how consensus is reached. In this article, I shall explain the channels and membership service provider.
Channels
In permissionless blockchains like Bitcoin and Ethereum, all peers share and have access to the same ledger. However, this kind of blockchain may not be suitable for business applications. For example, a supplier may want to set different prices for different wholesalers, and he would not want everyone in the supply chain to view this information. In this scenario, he or she will prefer to deal with the different wholesalers separately. To solve this issue, Hyperledger Fabric came out with the novel concept of channels that allow private transactions within the same network.
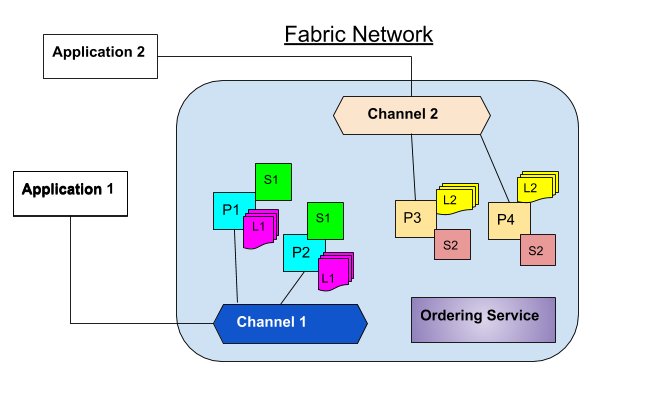
Channels partition the Fabric network in such as way that only the stakeholders can view the transactions. In this way, organizations are able to utilize the same network while maintaining separation between multiple blockchains. The mechanism works by delegating transactions to different ledgers. Members of the particular channel can communicate and transact privately. Other members of the network cannot see the transactions on that channel. The concept is illustrated in the following diagram:
The diagram above shows two channels, channel 1 and channel 2. Each channel has its own application, peers, ledger and smart contract (chaincode). In this example, channel 1 has two peers, P1 and P2 and channel 2 also has two peers, P3 and P4. Ordering service is the same across any network and channel.
Application 1 will send transaction proposals to channel 1. P1 and P2 will then simulate and commit transactions to ledger L1 based on chaincode S1. On the other hand, Application 2 will send transaction proposals to channel 2. P3 and P4 will simulate and commit transactions to ledger L2 based on chaincode S2.
Though our example shows peers belong to two distinct channels, in actual case peers can belong to multiple networks or channels. Peers that participate in multiple channels simulate and commit transactions to different ledgers. In addition, the same chaincode can be applied to multiple channels.
Membership Service Provider (MSP)
Hyperledger Fabric is a permissioned blockchain, therefore, every user needs permission to join the Fabric network. In order to obtain permission to join the Fabric blockchain network, the identity of every user must be validated and authenticated. The identity is important because it determines the exact permissions over resources and access to information that user has in the Fabric network.
To verify an identity, we must employ a trusted authority. In Hyperledger Fabric, the trusted authority is the membership service provider (MSP). The membership service provider is a component that defines the rules in which identities are validated, authenticated, and allowed access to a network. The MSP manages user IDs and authenticates clients who want to join the network. This includes providing credentials for these clients to propose transactions, defining specific roles a member might play and defining access privileges in the context of a network and channel.
The MSP uses a Certificate Authority to authenticate or revokes user certificates upon confirmed identity. In Fabric, the default Certificate Authority interface used for the MSP is the Fabric-CA API. However, organizations can choose to implement an External Certificate Authority of their choice. Hyperledger Fabric supports many types of External Certificate Authority interfaces. As a result, a single Hyperledger Fabric network can be controlled by multiple MSPs.
The Authentication Process
In the authentication process, the Fabric-CA identifies the application, peer, endorser, and orderer identities, and verifies them. Next, a signature is generated through the use of a Signing Algorithm and a Signature Verification Algorithm. The Signing Algorithm utilizes the credentials of the entities associated with their respective identities and outputs an endorsement. The generated signature is a byte array that is bound to a specific identity.
In the following step, the Signature Verification Algorithm will accept the request(to join the network) if the signature byte array matches a valid signature for the inputted endorsement, or reject the request if not. If the user is accepted, he or she can see the transactions in the network and perform transactions with other actors in the network. On the other hand, if the user is rejected, he or she will not able to submit transactions to the network or view any previous transactions.
In a previous article, you have learned that Hyperledger Fabric has a highly modular and configurable architecture. In this article, we shall examine the architecture in more details.
Hyperledger Fabric Network
Hyperledger Fabric is a permissioned blockchain network that provides ledger services to application clients and administrators. It allows multiple organizations to collaborate as a consortium to form the network. The permissions to join the network are determined by a set of policies that are agreed to by the consortium when the network is configured. The network policies may change over time subject to the agreement of the organizations in the consortium.
The Hyperledger Fabric network comprises the following components:
Ledger
Peers
Ordering service
Chaincode (aka smart contract)
Channels
Membership service provider
The Hyperledger ecosystem also consists of the client applications that allow users to interact with the network. Moreover, The Hyperledger Fabric application SDK provides a powerful API for developers to program applications to interact with the blockchain network on behalf of the users.
Peers
The Fabric network is comprised primarily of a set of peers or nodes. Peers maintain the state of the network and a copy of the ledger. In addition, they also host smart contracts(chaincode).
There are two different types of peers in Fabric, the endorsing peer and the committing peer. The endorsing peers (aka endorsers) simulate and endorse transactions. On the other hand, the committing peers (aka committers) verify endorsements and validate transactions before committing transactions to the blockchain. On a separate note, the endorsing peers can also commit transactions to the blockchain. Indeed, the endorsers are special kind of committers. However, the committers cannot be the endorsers. All peers can commit blocks to the distributed ledger.
Ordering Service
The ordering service is made up of a cluster of special nodes known as orderers. The ordering service accepts the endorsed transactions and specifies the order in which those transactions will be committed to the ledger. However, It does not process transactions, smart contracts, or maintains the shared ledger.
The Transaction workflow
Let’s examine the transaction workflow that involves the client applications, the peers and the orderers. By examining the entire transaction workflow, we will learn how consensus is reached in the process.
The transaction flow to reach consensus consists of three phases:
Transaction endorsement
Ordering
Validation and commitment
Phase 1 Transaction Endorsement
Transactions begin with client applications sending transaction proposals to the endorsing peers, as shown in the following diagram:
Phase 2 Transactions Simulation
At this phase, the endorsers will simulate the proposed transactions, without actually updating the ledger. The Endorsers must hold smart contracts in order to simulate the transaction proposals. In the simulation process, the endorsing peers will capture the set of Read and Written data, known as RW Sets.
These RW sets contain data that was read from the current world state while simulating the transaction, as well as data that would have been written to the world state had the transaction been executed. The endorsing peers then sign these RW sets and send them back to the client application for use in the next phase of the transaction flow, as shown below:
Phase 3 Ordering
At this phase, the client application submits the endorsed transactions and the RW sets to the ordering service. The ordering service will take the endorsed transactions and RW sets and orders them into a block and delivers the block to all committing peers.
The order of transactions needs to be established to ensure that the updates to the world state are valid when they are committed to the network. Unlike the Bitcoin blockchain or Ethereum, where ordering occurs through mining, Hyperledger Fabric allows the organizations to choose the ordering mechanism that best suits that network.
Hyperledger Fabric provides three ordering mechanisms i.e. SOLO, Kafka, and Simplified Byzantine Fault Tolerance (SBFT). However, SOLO is used only for experimentation purposes and SBFT has not yet been implemented. Therefore, Kafka is the default ordering mechanism for production use. The Kafka mechanism provides a crash fault-tolerant solution to ordering.
Phase 4 Transactions Validation
At this final phase, the committing peers validate the transactions by checking that the RW sets still match the current world state. In addition, they need to ensure that Read data that existed during the simulation process is identical to the current world state.
After the committing peers validated the transactions, the transactions are then written to the ledger, and the world state is updated with the Write data from the RW Set. Committing peers are responsible for adding blocks of transactions to the blockchain and updating the world state. Lastly, the committing peers asynchronously notify the client application the results of the transactions.
I shall discuss channels, membership service provider and chaincode in another article.
You have learned about Hyperledger in one of my previous articles. Hyperledger is not a platform but it is an umbrella body that incubates and promotes business blockchain technologies.
The Hyperlegder projects, which is known as The Hyperledger Greenhouse consists of five projects, as follows:
Hyperledger Fabric
Hyperledger Sawtooth
Hyperledger Burrow
Hyperledger Iroha
Hyperledger Indy
I shall introduce Hyperledger Fabric in this article.
Hyperlegder Fabric Key Features
Hyperledger Fabric is the first blockchain project developed and hosted by the Linux Foundation. It was initially contributed by Digital Asset and IBM, as a result of the first hackathon. According to the Linux Foundation , it was Intended as a foundation for developing DLT applications or solutions with a modular architecture.
Hyperledger Fabric is an open-source enterprise-grade permissioned distributed ledger technology (DLT) platform, designed for use in developing enterprise applications. It features some key differentiating capabilities over other popular distributed ledger or blockchain platforms.
One special feature of Hyperledger Fabric is that it allows components, such as consensus and membership services, to be plug-and-play. Besides that, Hyperledger Fabric uses container technology to host smart contracts called chaincode that comprises the application logic of the system.
Channels are another unique feature of Hyperledger Fabric. They allow transactions to be private between two actors, while still being verified and committed to the blockchain.
Hyperledger Fabric Architecture
Hyperledger Fabric has a highly modular and configurable architecture. Therefore, enterprises can make use of its versatility to develop innovative business applications. Besides that, it can be used to optimize the applications. Indeed, Hyperledger Fabric is well suited to develop a broad range of industry use cases including banking, finance, insurance, healthcare, human resources, supply chain and even digital music delivery.
Like Ethereum, Hyperledger Fabric also features smart contracts. However, it does not use Solidity as the programming language to code smart contracts. Hyperledger Fabric smart contracts are written in general-purpose programming languages such as Java, Go and Node.js. This means that most enterprises already have the skill set needed to develop smart contracts, therefore no additional training to learn a new language is needed.
Unlike Ethereum and many other public blockchains or DLT platforms, Hyperledger Fabric is a permissioned platform. It means the participants are known to each other, rather than anonymous and fully untrusted. In the Hyperledger Fabric ecosystem, while the participants may not fully trust one another, it can be operated under a governance model that is built with trust exist between participants, such as a legal agreement or framework for handling disputes.
Consensus Protocol
One key difference between Hyperledger Fabric and other DLT platforms is its support for pluggable consensus protocols. It enables the platform to be more effectively customized to fit particular use cases and trust models.
For example, when Hyperledger Fabric is implemented within a single enterprise or operated by a trusted authority, fully Byzantine fault tolerant consensus might be considered unnecessary as it might cause excessive drag on performance and throughput. Instead, a crash fault-tolerant (CFT) consensus protocol is more than adequate. However, in a multi-party, decentralized platform, a more traditional Byzantine fault tolerant (BFT) consensus protocol might be required.
Another significant difference between Hyperledger Fabric and other DLT platforms is that it can implement consensus protocols that do not require a native cryptocurrency. It means it neither need a cryptocurrency to incentivize costly mining nor to fuel smart contract execution. The avoidance of a cryptocurrency reduces some significant risk due to hacking via attack vector. Besides that, the absence of cryptographic mining operations means that the platform can be deployed with the same operational cost as other distributed platforms.
The combination of the aforementioned differentiating features makes Hyperledger Fabric one of the better performing DLT platforms available today both in terms of transaction processing and transaction confirmation latency. Besides that, it enables privacy and confidentiality of transactions and the smart contracts (chaincode) that implement them.
I shall discuss the Hyperledger Fabric architecture and chaincode in more details in another article.
The current school system is too structured, rigid, and inhibits creativity. The current school curriculum inadequately prepares the students to survive the fast-changing world of the 21st century. While schools need to comply with the national education policy to teach designated subjects, schools should include other programs that could help to resolve the aforementioned issue. Therefore, our school proposes building an ecosystem using blockchain technology where students can freely create and share their contents. We believe that the blockchain ecosystem will nurture young children in developing creative minds and entrepreneurial skills.
I have written this white paper for a hypothetical blockchain project. This blockchain project is to build a private blockchain ecosystem for an international school.
First, we need to conduct a feasibility study before we start planning any blockchain project. Here, I am using a methodology called the CATWOE analysis. It can be applied to any new project.
CATWOE Analysis of Building a Blockchain School
CATWOE is an acronym that stands for Customers – Actors – Transformation process – Worldview – Owners – Environmental constraints. It’s a simple analytical approach to find solutions to problems. The CATWOE Analysis makes it possible to identify problem areas, look at what an organization wants to achieve, and which solutions can influence the stakeholders. The analysis uses thought methodology from multiple perspectives. It is especially useful for an organization that wants to implement a new project that involves a drastic transformation process. The implementation of the blockchain technologies in a school curriculum qualifies for such transformation. Therefore, there is a need to understand the problems and try to find solutions before we proceed with the project implementation
C – Clients
They are the users and stakeholders of a system. In this case, they are the students, teachers, parents, the management staff, the education department, and others. They will benefit if the change is positive and the problems are solved. However, they may stand to lose or suffer if the change is negative and new problems are created. Therefore, we need to find out whether the blockchain technologies can solve current problems and bring positive changes in the school system. If the outcome could be negative or even damaging, we need to abort the project.
A-Actors
They are usually the employees within an organization, in this case, teachers and support staff. They are responsible for carrying out work and involved with the implementation of the blockchain system. Therefore, we need to conduct an inventory analysis to know their qualities, capabilities, and interests to get a clear picture of their impact on the organization. We may need to hire new employees or retrain the current ones to ensure competency with respect to blockchain implementation. We also need to conduct training for the employees.
T – Transformation Process
Transformation is the change that a system or process leads to. It’s the process in which input (including raw materials, man-hours, knowledge) is transformed by an organization into output (such as a final product or solution to a problem).
To implement the blockchain system, we need to know in advance what kinds of input requires and forecast what the end result (output) will be. Besides that, we have to carefully consider the intermediate steps. In this case, the input is the blockchain technologies and the output could be a system that churns out an intelligent pool of young entrepreneurs that thrive on co-creating and co-sharing.
W – Worldview
Stakeholders often have different ideas and approaches to the same issue, with other conflicting interests. The goal of the CATWOE analysis is to make their different viewpoint explicit and try to achieve a methodology stand. In this project, we need to achieve consensus among the stakeholders that involve the students themselves, we don’t want to force the ideas on them. Besides that, some teachers might have fear in carrying out the transformation as they have to learn new technologies. Parents would be very concern about the implementation of the blockchain technologies because it will bring profound impacts on their children, either positively or negatively.
In addition, the government might want to regulate the project to ensure it complies with the national education policies and philosophies. On the other hand, business leaders may want to look for financial gains by sponsoring the project or they may refuse to support the project at all. Therefore, there is an urgent need to conduct surveys and research to figure out how to secure agreement from most stakeholders to implement the project.
O – Owners
This usually refers to the owner, entrepreneur or investor of an organisation, who wants to make changes and who decides whether a project should start or stop. As decision makers, they have the highest authorities. Commitment and support from the aforementioned parties are important to ensure successful implementation of the blockchain project and also long term sustainability of the project.
E – Environmental Constraints
This is the actual environmental elements that may influence the organization and can limit or restrict the implementation of the blockchain technologies in the school system. Examples include political influence, ethical boundaries, regulations from the government, financial constraints and social factors. There is a need to work closely to overcome the constraints via negotiations and other means with the regulators and other parties
After conducted the CATWOE analysis, I have identified the following problems where most schools are facing.
Problems
The Current school system is too structured and too rigid, inhibiting creativity
The Curriculum methodology too centered on academics and examinations
Teacher-centered, lack of peer learning
The Administration is centralized and autocratic
Does not prepare children for the future
Lack of participation from stakeholders
The proposed solution
Create a self-perpetuating and self-sustaining ecosystem where students can create and share digital content. It can also include tangible things like arts and craft, scientific inventions, or intangible things like music, song, new ideas, games, and so on. These tangible assets can be digitized and shared among the students.
Not only they can share digital content, but they can also buy and sell them. It is akin to an autonomous economic system where students can self-fund their projects by trading their digital assets.
The latest technology that can power this system is blockchain, a subset of decentralized ledger technologies.
The ecosystem should be enlarged to include the actors of the system – the teachers, coaches, supporting staff and the administrators.
The ecosystem must also be connected to stakeholders, including the business owners (who can provide financial support and sponsorship), the government (who may want to regulate the activities in the system), parents (who are concerned with their children development), etc.
The ecosystem can be extended to include students from around the world in the future.
The Architecture
Create a permissioned private blockchain platform for the students. The students can interact freely in their own close-loop decentralized and distributed ecosystem.
Content or assets can be created and tokenized and shared among the students. They can trade their assets using the tokens, creating a token economic system.
Develop APIs so that the stakeholders can interact with the blockchain. Administrators and teachers should be allowed to monitor and delete certain contents that are inappropriate like pornographic materials etc via the API. On the other hand, parents can monitor their children progress but may not be allowed to delete the contents or add comments. In addition, business owners and investors can monitor the progress of the project and provide support and advice if necessary (for example if the system crashed or stalled). In addition, regulators might want to monitor the blockchain for compliance.
Proposed using Ethereum Proof of Authority(PoA) protocol known as Clique. The benefits of using PoA are as follows:
Saves electricity power
Eliminates the need to invest into large numbers of ‘Miners’ servers
Increase the transaction speed tremendous compared to Proof-of-Work(PoW)
Better security since only members can access the network
The ecosystem can be hosted on a cloud server like AWS and Microsoft Azure but you can set up your own servers. The conceptual model is illustrated in the figure below:
The Legal Framework
Obviously transforming a school into a blockchain school needs to obtain approval from the Ministry of Education. It has to comply with national education policies. Therefore, we need to design the blockchain platform as a new approach in teaching and learning, keeping content within the requirements of the curriculum imposed by the MOE.
**You may use my ideas to write a paper if you are embarking on a similar project, but prior consent from me is necessary.
By definition, gas is a unit that measures the amount of computational effort that it will take to execute certain operations on the Ethereum blockchain. The operations include sending tokens, deploying a smart contract, interacting with a contract, sending some ETH, launching an ICO, or anything else on the blockchain. Gas is needed to power the Ethereum Ecosystem, just like fuel is needed to power a car.
What is Gas Price?
As I have mentioned earlier, we need to use gas for every operation made on ethereum, regardless of whether your transaction succeeds or fails. Gas does not come free, we need to pay for it, just like paying for the gasoline in order to drive our cars. How much transaction fee we need to pay depends on the gas price and the gas limit.
Gas price is the amount of Ether you need to pay per unit of gas. It is measured in Gwei (1Gwei=0.0000000001 ETH). Its value is determined by the miners, who can refuse to process the transaction with less than a certain gas price. The transaction fee is paid to the successful miner as a form of incentive that motivates the miners to maintain the nodes. Therefore, they have the controlling power over the gas price. We must have enough ether in our wallet to pay for the gas fees.
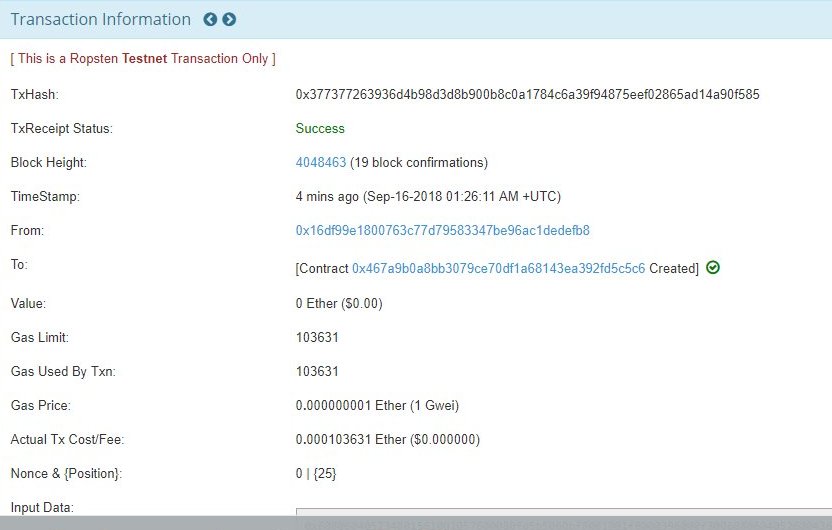
The transaction fee is calculated using the following formula
Transaction fee= Gas unit used x Gas price
For example, for a certain transaction,
gas unit used=103631
Gas price= 1Gwei or 0.000000001 Eth
So transaction fee= 103631×0.000000001 Eth=0.000103631 Eth
You can see the actual output in a smart contract deployment on Etherescan, as shown in the figure below:
In addition, you can “bribe” the miners to do your work first by paying more gas fees. In this way, you can jump to the front of the queue so that your transaction can be processed first. Even if the transaction fails, you still need to pay for the transaction fee because the miners must validate and execute your transaction.
Gas Limit
The Gas Limit is an estimation of the total amount of work to perform a transaction. It is not easy to compute the gas limit. Fortunately, there are many apps that set the limit for us. Typically, 21,000 Gas will satisfy most transactions. However, for more complex transactions such as sending ETH to an ICO smart contract, the gas limit will be much higher. The reason is such a transaction requires much more computational power.
If you set the limit is too low, your transaction may take too long to process and even fail. As a result, you will lose ETH for nothing. On the other hand, if your transaction was completed before reaching the gas limit, you get back the balance ETH. The Gas Limit protects you from spending unlimited ETH, just like what banks set your credit card limit so that you will not overspend.