What is Solidity?
Solidity is a high-level programming
It has Python, C++ and JavaScript influences and is used for Ethereum Virtual Machine ( EVM ). As a result, it is fairly convenient and easy to grasp for those that are already familiar with the Python, C++ or JavaScript.
The IDE for Developing Smart Contracts
The best tool to write, compile, test and deploy smart contracts is Remix. Remix is a browser-based IDE that provides an inbuilt compiler as a well as runtime environment without server-side components.
We can also use other code editors for Solidity. I suggest we use Visual Studio Code or Solidity Plugin for Visual Studio. For the Solidity plugin, you need to download it from https://marketplace.visualstudio.com/items?itemName=ConsenSys.Solidity.
Besides that, you need to install Visual Studio 2015.
Writing Your First Smart Contract in Solidity
A smart contract is a data, that can be referred to as its state, and code, which can be referred to as its functions, collection, that resides on a specific address in the Ethereum blockchain.
The first line of the smart contract is always
pragma solidity ^0.4.24;
pragma is a keyword which is used to instruct the compiler how the source code should be treated. In this example, the pragma specified that the source code is written for the Solidity Library version 0.4.24
To define a contract, we use the statement
contract contractName {

}
You can use any name for the contract, but any meaningful name will be better. For example
Contract  NewCoin{

}
indicates that you intend to create a contract for a new cryptocurrency.
Assigning variables
Next, we would like to introduce some variables into the contract. First of all, let’s assign some string variables and some integer variables.
To assign a string variable, the syntax is
string myName;
In Solidity, there are two types of integers, the signed integer and the unsigned integer.
A signed integer means it can store positive or negative values while an unsigned integer can only store positive values.
To specify that it will be an unsigned integer, we use the keyword uint before the name of the new variable.
To assign an unsigned integer, the syntax is as follows;
uint MyAge;
Access Modifier
You may want to add the access modifier(or visibility modifier) private or public to the variable. Most programming languages put access modifier in front of the datatype specifier like private string name but in Solidity, we put access modifier between datatype specifier and the variable name, as follows:
string private myName;
String public myName
uint private MyAge;
uint public  MyAge;
Writing the Smart Contract Code
Now launch Remix IDE. Create your first smart contract by clicking on the little + button on the far left corner of the Remix IDE. A new dialog will appear and you can create a new Solidity file.
After creating the new file, a new window will appear on a new tab displaying your new file. The file will also be show on the left pane of the IDE under the browser.
Now, let’s create a new contract by entering the following code into the Remix IDE.
pragma solidity ^0.4.24;

contract myContract {
    string private name;
    uint private age;
}
The first line inside the contract itself declares a string name and an unsigned integer variable called age.
We have already created a simple smart contract though it does not do anything yet. You can compile and deploy it if you want to.
Now let’s add some functions to the smart contract
pragma solidity ^0.4.24;

contract myContract {
    string private name;
    uint private age;

 function setName(string newName) public{
    name = newName;
 }

  function getName() public view returns (string){
    return name;
  }

  function setAge(uint newAge) public{
      age=newAge;
  }
  function getAge() public view returns (uint){
      return age;
  }
}
We create the function setName to allow the user inputs a string value. Set the modifier to
To return the value of name entered by a user, we create the function getName
The view keyword in public view returns is the replacement for constant. It indicates that the function will not alter the storage state in any way.
Next, we create the function setAge by declaring a parameter newAge as an unsigned integer. The setAge function will allow the user input an integer value when you deploy the contract.
To return the value of age entered by the user, we create the function getAge
Now compile and deploy the Remix IDE, the output is shown in the following figure:
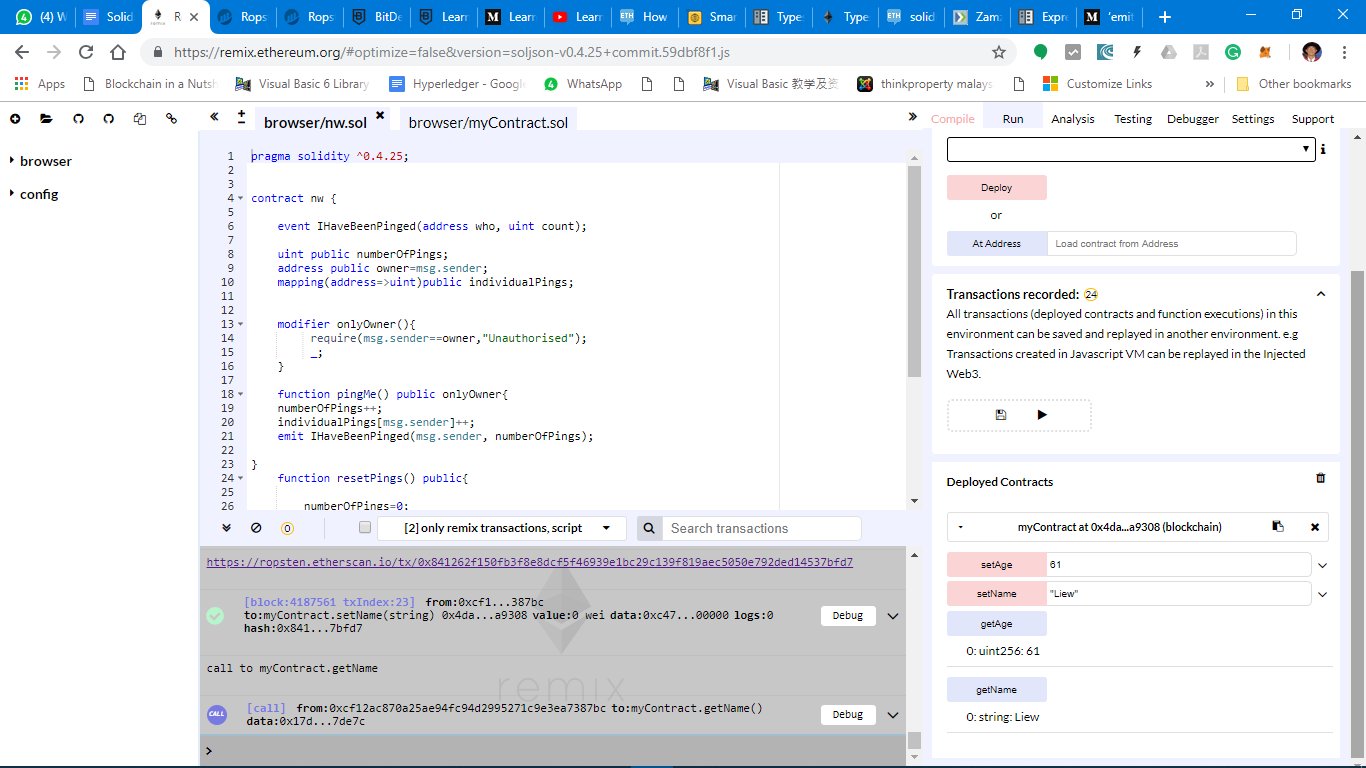
When you deploy the contract, a transaction is executed from your wallet address to the contract. A gas fee is charged in the process. You can view the transaction on Etherscan, as shown below:

When you click on the setName function, a transaction will also occur. You need to wait for the transaction to complete before you click on the getName function. You can see that whatever you entered in the setName box will appear on the getName box. You can do the same for the setAge and getAge functions.